• When is a Two Bucket Wash not necessary
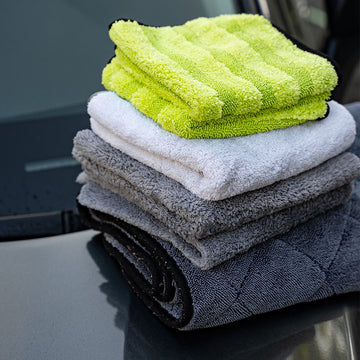
• Prepping all of the wash equipment - pressure washer, buckets, foam cannon, wash pads, drying accessories, and more
• What part of the vehicle do you rinse first and why you should foam down your car
Cart
Your cart is empty
• When is a Two Bucket Wash not necessary
• Prepping all of the wash equipment - pressure washer, buckets, foam cannon, wash pads, drying accessories, and more
• What part of the vehicle do you rinse first and why you should foam down your car
• The benefits of using a Grit Guard or grate in your buckets
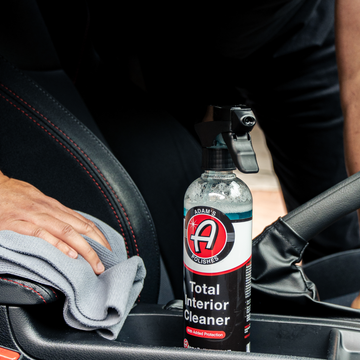
• How to properly clean dirty door jambs, inside of the tail gate and rear hatch glass, gas caps, and other very dirty areas on the vehicle
• When do you remove the soap residue and how do you safely dry your vehicle
In this video, Adam and Joe show you how to do the most effective Do-It-Yourself car wash process in your driveway. Unlike our DIY Express Wash Video, where the goal was to quickly and efficiently wash and dry your vehicle in under 30 minutes, this video showcases the ultimate wash - the most complete and safe method to clean your vehicle, using the Two Bucket Wash Method along with a pressure washer and foam cannon. We'll cover everything you need for this complete wash below, but the first question you might be asking is "When should I do this complete wash versus an express wash?" There are several instances where you want to do a more thorough wash like this, to take every precaution to avoid potential damage to surfaces when cleaning them. One such example is if your vehicle is very dirty with mud buildup. Another scenario for doing the ultimate wash is after you have already spent significant amounts of time decontaminating, compounding, polishing, and applying a Graphene Ceramic Coating, since you do not want to reintroduce any swirl marks or wash-induced scratches back into the corrected finish. Lastly, if the vehicle has black paint or another dark color paint, we strongly suggest doing a more complete wash, since defects like swirl marks, scratches, and water spots are going to be much more visible and easier to see on dark paint.
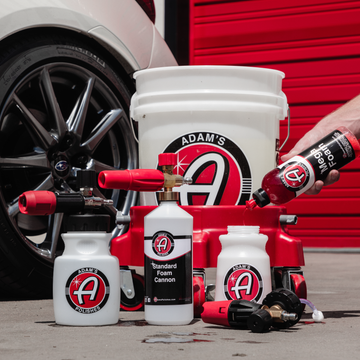
Before you jump right in and start rinsing your vehicle - stop - gather all of your washing equipment and accessories first! The more times you have to walk back and forth from the garage to grab a bottle, a brush, or drying towel, the longer you may have hard water sitting on the surface with the chance of forming water spots. We've already cleaned the wheels and tires first in a separate video, so make sure to empty out your wheel bucket if you are reusing it to wash the rest of the vehicle. Clean out any dirt and brake dust grime from the bottom of the bucket, rinse off the Grit Guard or grate, then clean out the various wheel and tire brushes and set them aside on your Detail Cart. Next, fill both buckets about 2/3 with fresh clean water, and re-insert the Grit Guard or grate back into the bucket. Get your Pressure Washer ready and setup your Foam Cannon with Mega Foam shampoo. Prep your preferred Wash Pad or Wash Mitt by pouring Car Shampoo directly onto the mitt surface rather than pouring it into the water in the bucket - this way you will generate a ton of suds into the wash pad or wash mitt when you place it into the Soap Bucket and activate the suds with the pressure washer. Gather up any additional detailing gear like the Air Cannon, Detail Spray, and your Ultra Plush Drying Towel and place them on or near the Detail Cart, so that they are nearby and ready to go once you have finished the wash.
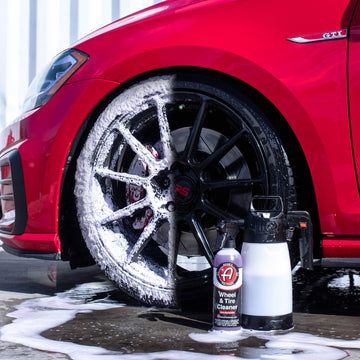
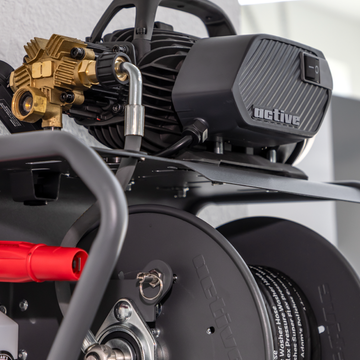
Using a pressure washer to rinse the vehicle first is a very effective way to remove a significant amount of dirt and grime before you even touch the vehicle with soap or a wash pad. A pressure washer with the correct spray tip at a safe distance will remove far more dirt and debris than a garden hose. Start by rinsing areas of the vehicle that are shaded first, rinsing from the top of the area downward. The lower portions of the car will usually have the most dirt, so you do not want to blast that dirt upward onto doors, windows, the hood, etc. We rinse the shaded areas first, one panel at a time, because they will have less chance of the water evaporating and causing water spots. Then quickly rinse areas in the sun, and immediately connect the Foam Cannon and foam the vehicle in the opposite order - foam down the sunny side first and then foam the shady side last. By having the Mega Foam solution on the surface, you are instantly preventing water spots since the soap itself can dry on the surface and still rinse cleanly. Foam down the wheels as well, since they are wet, and as Adam says "The soap stops water spotting."
Many will ask, is a foam cannon necessary? A foam cannon is not entirely necessary, but the benefit of adding the foam layer is to provide a slippery, lubricated surface for the wash pad or wash mitt to glide over the paint more easily, which again reduces the chances of creating new swirl marks or scratches in the finish. The foam also helps to loosen and lift the dirt, bugs, and other grime from the surface, meaning you do not need to scrub as hard to clean areas. Once you have foamed the area, then you begin washing with the wash pad. Again, wash a panel from the top down, and if the panel is very dirty, flip the wash pad half way through to use the clean side. Next, put the wash pad into your Rinse Bucket, scrub it out on the Grit Guard to remove dirt, then squeeze out excess water and reload it with more soap from your Soap Bucket. If you are not familiar with this "Two Bucket Wash Method", it simply means you have one bucket to use for your clean soap solution, and a second rinse bucket filled with only clean water that you use to scrub out your wash pad on a grate, which keeps dirt at the bottom of this bucket and out of your soap bucket. This way you never reintroduce dirt back onto the vehicle.
Once you have washed all panels, it's not time to rinse the soap off just yet. Make sure to clean the door jambs, inside of the gas cap, and especially inside of the rear tailgate hatch and around the tailgate glass on an SUV or wagon. These areas get very dirty very quickly, especially during harsh winter months. You do not want to do a dry-wash on these areas with Waterless Wash as your first thorough wash in the Spring season, since you could easily scratch these very dirty surfaces. Adam shows how to angle the pressure washer nozzle just right to clean these areas without introducing water into the vehicle. It will take a little practice at first, but in time you will get better and better at controlling the pressure washer stream to not soak down your interior. These seals and inside the gas cap are also areas where the Rubberized Trim & Lug Nut Brush can easily clean tight areas where the larger wash pad will drip soap inside of the vehicle or may simply not fit.
Now we're ready to rinse and dry! Just as we started the pre-rinse in the shaded areas first, we will rinse the soap from the shaded areas first and then move onto rinsing the areas in the sun last, so that standing water is sitting on the sunny surface for as short of a time as possible. Very lightly mist Detail Spray around the entire exterior to act as a drying aid to help minimize water spots as you dry. You can then use the Air Cannon to blast away heavy amounts of water, especially around emblems, mirrors, door handles, lug nuts, headlight seams, and intricate nooks and crannies in bumpers. Lastly, take The Ultra Plush Drying Towel and wipe up any remaining water. Start by drying the glass first to get some water into the towel, to soften it up before wiping the paint. Dry the areas in the sun first, then move onto the shaded areas, and then finally the door jambs last. Use the thick side of the Ultra Plush Towel to absorb the most water, then flip it over to the thin side to dry glass to a streak-free finish. On large trucks and SUV's, you may end up using two Ultra Plush Drying Towels to dry the entire vehicle, as one towel might become too saturated with water to finish larger vehicles. You're all set - you now have the knowledge to do a thorough and safe wash on your vehicle to keep it looking excellent throughout the year!


